Pinterest Twitter Instagram Teachers Pay Teachers Blog Lovin' Facebook Image Map
Showing posts with label what worked. Show all posts

June 1, 2016

What Worked: Fluency and Goals AND a Birthday Giveaway!

Happy first day of June! And a very happy birthday to my buddy, Celeste over at The Education Highway! <3 There's a birthday giveaway going on over at her blog (I have it linked at the bottom of this post as well), so check it out and good luck!


It's Wednesday, so you know what that means!! What Worked! What Worked is a blogging series intended for reflection on this past year. I changed grade levels this year and had to make a lot of changes to my instruction to reach a different age group. This series is all about "what worked" in my classroom this year. Here's the schedule: (bloggers, feel free to link up your own reflections at the bottom of the post).


This week is all about Fluency and Goals. Second grade is a BIG year for reading fluency and because it was the first time I taught it, I needed to figure out a way to make it successful. If you do not concern yourself so much with fluency, this post is still beneficial to take a look at as it also discusses student-centered goal setting which can be used in any subject for any child.


Let's begin with Reading Fluency!

My district sets a words per minute (wpm) goal for each 9 weeks for Second Grade. The benefit of that is that students understand that once they hit that number, they've hit their goal. In order for it to be easy for the students to track themselves and to see easily every day was to make some sort of visual tracker. This was something that the other Second Grade teachers were on board with and we all made something visual for the kids to be able to monitor their own progress.

I made a "Fluency Flower."
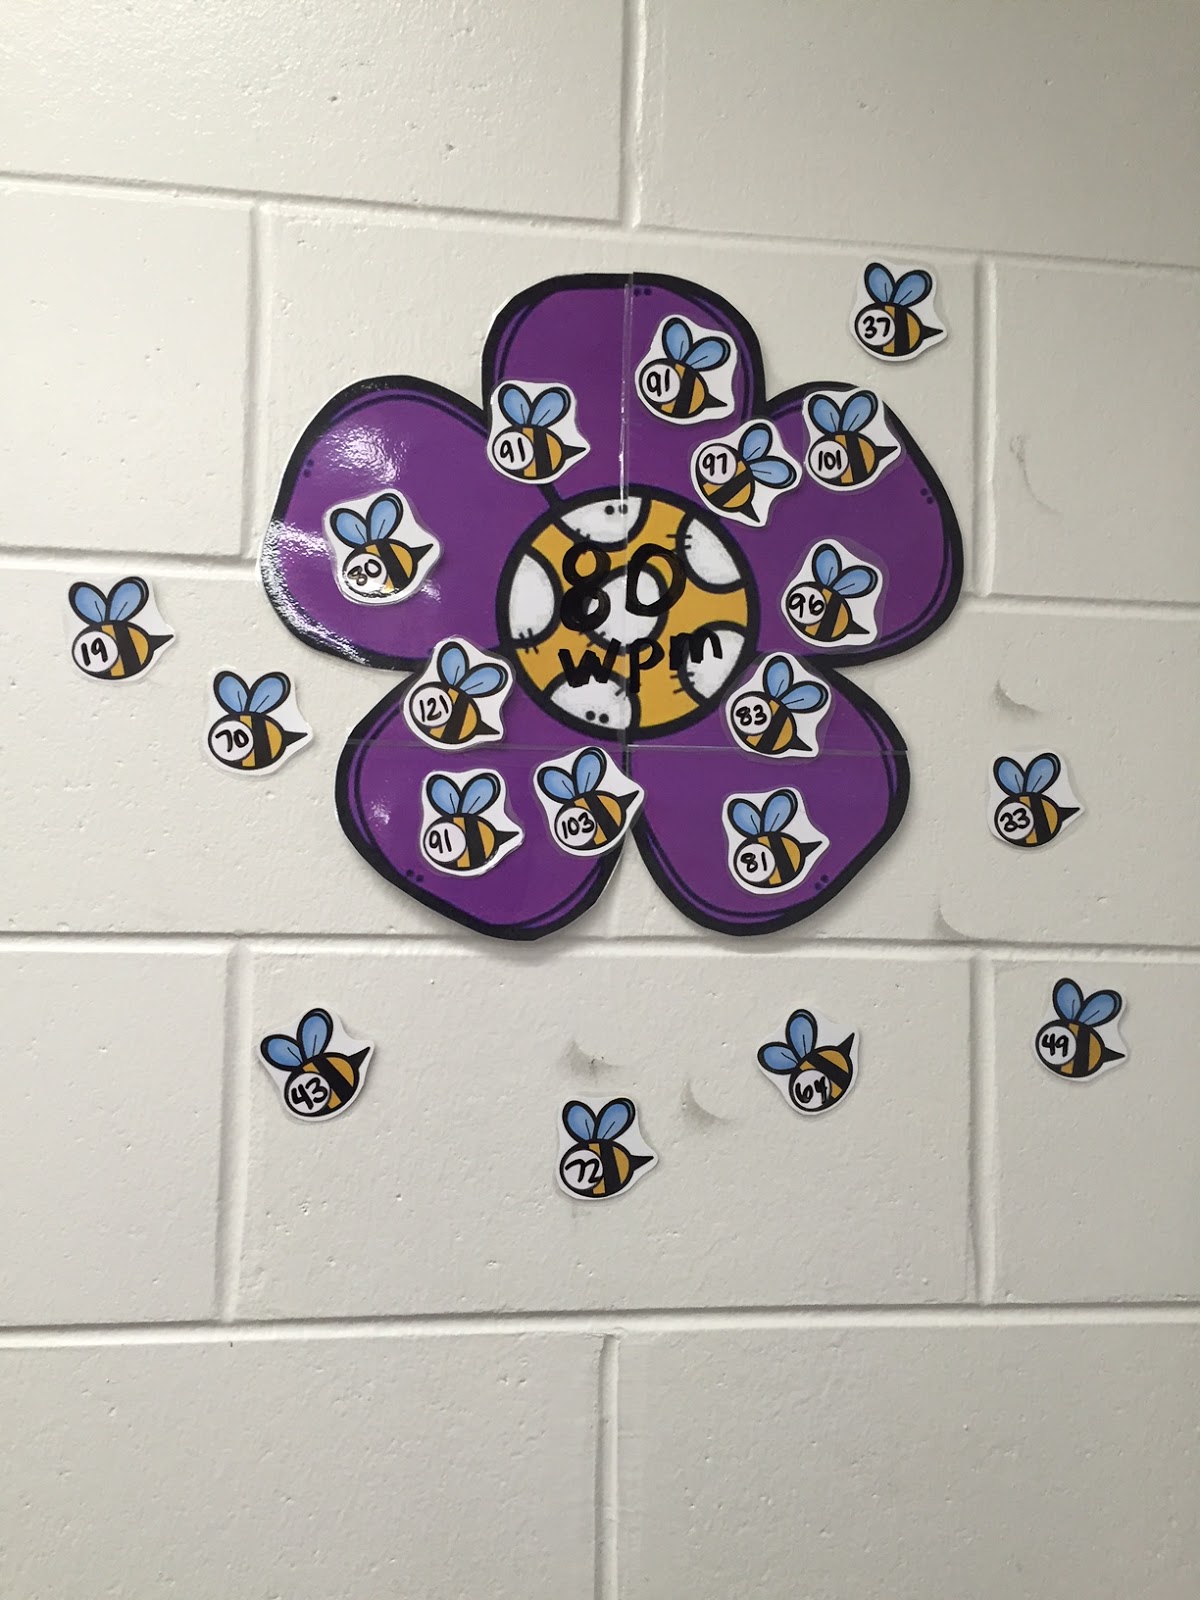

Each student had a laminated bumblebee (clipart courtesy of Creative Clips, of course). By laminating them, they became dry erase. I did not put student names on the bumblebees. Students were in charge of knowing which number was their's. I felt like having names on them would broadcast the names of students to each other that were not making their goals. The way it worked was the wpm goal was in the center of the flower like a target. After fluency checks, we would update their bumblebee's number. If it exceeded the number in the middle of the flower, their bumblebee could be moved to the petals. If not, we kept the bumblebee off the flower but certainly noted that we got a lot closer. 

WHAT WORKED:
1) The visual target was in an easy to see spot in the classroom and students were very excited to work on their fluency goals to get their bee on the flower!
2) It helped with number sense, which was a surprising benefit. Students could easily see that if they got 70 wpm on an 80 wpm goal that they only needed 10 more words per minute. 10 more words per minute sounds a LOT better than saying, I need to get to 80.
3) Students did not feel ashamed or embarrassed about their fluency. Because there were no names on the bumblebees, students were internalizing their goal and keeping it with them to work on, which became far more engaging and inspiring to work on than impressing their friends.
4) I just used looped Scotch tape on each bumblebee and they lasted all year long! Any time a student needed to be moved, we just peeled him off the wall and plopped him on the flower!


Any time you have to track something, it always raises the question of how to organize the data. Organization has never been a strength of mine, but the little system I came up with WORKED wonders throughout the entire year. I snagged some of these number tabs from an office supply store and each student's fluency checks were in there (more on where I got the fluency checks from next).

WHAT WORKED:
1) It was all in one place (huge for me or I will lose it...)
2) The students knew their number and when they came up to my table to check their fluency, they knew where to tell me to go. Teamwork makes the dream work, people!
3) I kept these right with their goal folders (more on that later) and it made everything so easy to access.


There are many places to get fluency passages. TpT is a great resources as is Readworks.org. However, the reading curriculum (Reading Wonders) that is used by my district, has a fluency passage each week that goes along with the content we are reading about each week. The way I scheduled this is as follows. We had a "Fluency Check" once at the beginning of each month and once at the end with the same passage. I always chose the last week's passage because they got a little tougher as they went on and the students loved the challenge. The other passages I would send home as homework to track fluency each week. I also had an extra in a plastic sleeve in the Reading center that students could practice with a friend. I changed it out every week and kept the "Fluency Check" passages up with me.

WHAT WORKED:
1) These were free and already provided to me for the entire year. If you do not have a reading curriculum that offers these passages, check out Readworks.org. 
2) They were predictable. Students knew that the last week's passage goes to me (so that they don't memorize them when they practice) and each week they would get a new one to practice with.


Okay, let's talk about goal setting. I made an amazing purchase on TpT this past year on goal setting and it totally changed how my students worked to achieve them. 


It was created by What I Have Learned. I set it up a bit differently than she has it in her product and these were not sent home. I did a mini-lesson on goal setting and put it into practice as students worked at their own pace on their chosen goal. Each page to print in her product is for a different standard, but she has editable pages as well. Because of the way I structured it in my classroom, I simply printed out a blank goal sheet and we wrote in what each child wanted to work on. It was important to me that students choose their goals with guidance from me. I learned that students are more likely to achieve a goal they want to achieve than if I were to assign a goal to them. 


Because our one on one meetings needed to be short and because I wanted students to focus more on what the goal was and the things they could do to reach it, I did the writing. This particular student really wanted to read his first chapter book. A friend told him about the book but he was a little scared to read it because it was harder than anything he'd read before, even though it was on his reading level. We discussed why this was important to him, what he could do to help him, and we came up with a measurable outcome. That is very important to remember. Students will say "I want to get better at _____," but without a way to measure it, students won't know if they have gotten better or not. This specific measurable outcome was a score on an AR test for the book he wanted to read.

WHAT WORKED:
1) The arrow in the product page was very easy to see and understand.
2) Each blank allowed us to analyze why we wanted a goal and what the specifics of the goal were. There was no confusion!
3) This product page was completely editable and I was able to customize the bottom part to fit my class.


If you look at the bottom of the page above, you can see that there's a date area for "Next goal check." I did not get a picture of this because I ran out of pages for it! I had one of those giant desk calendars on my table where we did goal checks. After we met a goal, the students set another one and signed up for a date on the calendar. This took a lot of practice and guidance. Some students wanted to meet their goal in just and day and others didn't want to see me for another 2 months! So the guideline was that even if they didn't meet their goal, we needed to meet and talk about it at least every 2 weeks so that they don't forget what to do!

WHAT WORKED:
1) It kept me on a schedule. The kids were picking dates to come see me during centers and I knew ahead of time which folders to pull and get ready.
2) Students were able to keep track of how much time they had to try to achieve their goal. I usually had kids during centers and in the morning when they came in to class go to the calendar and check what day it was.
3) Kids loved using the colored pens to write their names in. It's the little things, sometimes.


I was SO pleased with the way this system worked for my class this year. My students became far more driven to achieve these goals that they set on their own than they were before I introduced it. Fluency scores spiked by the end of the year (a LOT of students put fluency as their goal for their folders and it helped tremendously). They REALLY wanted their bumblebee on that flower!!


Stop by next week for "What Worked" during the Math Block in my classroom!


If you'd like to link up your blog posts on today's topic (or any of the previous ones), here's what you need!

RULES:
1) Must include the What Worked Schedule in each post that links back to Daisy Designs.
2) Links MUST be to BLOG POSTS relating to the topic of each week. NO PRODUCT LINKS. Product links and photos are totally okay within your blog post, but not as a link in the linky.
3) Check out the other bloggers' posts and comment on the one posted before yours.

And here are the images you'll need to get started!


And now! Onto the fun birthday giveaway! Happy birthday Celeste!

The product I donated to her giveaway is GREAT for the summer!


You can win this product in addition to a TON of others in Prize Pack #1 by entering below or by checking out her blog HERE. There are a total of FOUR Prize Packs, so head to her blog and enter them all!


a Rafflecopter giveaway


May 25, 2016

What Worked: ELA Centers

Last week was the first week of a five week blogging series here about reflecting on this school year. Last week I shared my best practices and "what worked" in regards to Science Notebooks and I loved getting to share all the photos and links to the resources I've used all year that have really impacted my students. You can check out the Science Notebook post by clicking HERE.


This week we are moving on to ELA Centers! I changed the way I approached centers/stations this year and it definitely worked! Read on to check out what worked in my classroom this year.


First off, let me start by saying that last year, I had a TEENY TINY classroom and rotations didn't quite work out with the space I had. Last year, I approached centers by free choice and unfortunately due to space, a lot of the center activities took place at the students' desks. This year, I was moved to a classroom literally twice the size and with more storage space than I can fill (I still have empty cabinets...). I wanted to take advantage of the space this year and had a lot of seating choices for my students to use during center rotations.


Here's how it worked. Pictured above is our Center Wheel. I laminated a poster board and wrote in four different centers. I wrote them in dry erase marker which made it easy to change, so while it doesn't look fancy, it was way easier and more functional for me which has been more important to me this year. I liked to do special centers every now and then (for example, in February, we had the following four special centers: Valentine's Day, Black History Month, Chinese New Year, and President's Day). It was easy to simply erase the marker and write in something new. Generally speaking, however, these were our usual centers. 

The theme of my classroom decor this year was garden and bugs theme and since Second Graders do a big unit on life cycles, the group names were the different stages of a butterfly's life cycle! I made the wheel out of card stock pieces, laminated and taped together with a brad in the middle to connect it to the poster board. The arrows didn't only serve as the progress of a life cycle, but in which direction the wheel is turned for rotations. Worked like a charm!

So in summary,
WHAT WORKED:
1) The lamination made the wheel dry erase which made it simple to change group members and centers if needed.
2) The arrows used in the life cycle helped students know how to turn the wheel when we were rotating.


I am a big supporter of free choice in the classroom. I have found, this year especially, that students are more engaged and more likely to complete tasks if they have a say in what the task is. That being said, I went with a "Must do, Can do" system. Each center had a list of things that the students must complete followed by a list of things the students can complete by choice when they have completed the "must-do's." At the beginning of the year, I gradually got the students on this system with me when I knew they could handle the choice and responsibility. So in the beginning, there was a step by step list in each center. They would complete step 1, move to step 2, step 3, etc. This got them accustomed to the type of activities in each center and allowed me to monitor how each student worked. I had the students who got through every single step of the center and then I had some that barely completed step 1. As time moved on and students became more responsible, we went to the "Must-do, Can-do" style setup and it worked amazingly.

WHAT WORKED:
1) Students were very engaged and excited to work in their centers.
2) I saw an increase in quality work completed, even with the "must-do" activities.


Now let's move on to each center!

Let's begin with Computers and work our way clockwise on the wheel.


My school subscribes to Storia, which has been an AMAZING resource! These are e-books available on the computer with read-to-me capability, comprehension quizzes after the story, and sometimes even games like word searches and create a scene. Unless a student had a computer intervention, the students were to read an e-book on Storia, take the "practice" comprehension quiz at the end, and then take an AR test on the book. After that "must-do," students could continue to read on Storia or they could work on other projects we were working on (typing/publishing writing, researching on World Book Online, etc.). (Sorry that the picture is not where it was in my classroom. I already took them down for the summer! Good thing I didn't pack them away yet!).

WHAT WORKED:
1) Students were READING! The level of engagement was extremely high and if your school subscribes to Storia, I highly recommend using it.
2) Students could choose their book based on their reading level. The students were in control of choosing their book to read. As a teacher, I also had the ability from my Storia account, to assign books to students, which I did occasionally especially if I found ones that applied to specific skills a student may have needed extra practice on.
3) The practice quizzes at the end of the stories were great indicators to myself and the students if they were ready to take an AR test. These were usually 3-5 questions long and helped prepare the students to take a "real" AR test. AR scores increased by quite a bit!


My district uses the Houghton-Mifflin Reading Wonders series and set up the curriculum maps/calendars to follow this program. I have found that not everything in the series was perfect for my class, but the stories in the reading books were awesome! First students were to read the short (2-3 page) story in their "small" reading book (I wrote the page numbers in on the laminated Must-Do list and changed them each week). In the Wonders series, this is called the Reading Writing Workshop book. They could choose to read independently or with a buddy. At the end of the story there were always two questions that were usually text-to-self questions, comprehension questions, or questions about our Essential Question of the week. In their reading journals, students answered these questions and moved on to choosing their own book to read or to practice their fluency. They could also take an AR test if they were ready as I always had a computer in the room reserved for that task.

Here's a peek at a student's Reading Notebook page. This particular story had 4 questions. This took a lot of modeling and working together in whole group before students could accurately answer the questions. Some of the questions took some thought and sometimes a discussion with another student. But by April, like in this picture, my second graders would express themselves pretty well. It was a procedure of mine to include the date and page numbers at the top of each one so I could easily check through their pages for completion and accuracy.


WHAT WORKED:
1) The way I had my classroom set up, students could sit anywhere they liked to read as long as they stayed on task. I loved looking around the room and seeing kids sitting in bean bag chairs, in the wicker lounge chair, my comfy armchair, or just plan laying on the floor with a friend.
2) The stories they were reading were always tied to our Essential Question and kept it a focus throughout the week.
3) When students were done with the textbook, they could choose their own book and it kept them on top of their AR point goals.


The writing center changed a few times throughout the year as the students' ability to write independently got better. In the beginning, students had very specific writing tasks, such as write a list, write a letter, or journaling. As the year moved on and students were really doing well with writing, all I did was post the Essential Question of the week as their writing topic with the instruction that they needed to plan their writing and complete a piece throughout the week. It got to a point where I didn't even have to have this list up because they knew that the Essential Question was what their writing topic was and they just went to town! Students would use their textbooks to help them cite evidence, have peers read their writing and gain feedback, and sometimes (if time permitted) would type their papers when they got to the computer center. My quick and very accurate writers would sometimes finish their paper early so even though not many students got to the "can-do" part of the list, I had to have one for my early finishers. I purchased a set of Highlights Story Starter cards and they were so much fun. Students chose a card and finished the story! Most of the time, they were silly and fun, but students were getting a lot of writing practice in and loved it.

Here's a picture of the Writing Center where you'll see the "bins" referred to in the Must Do list. That's where all paper materials were found. Worked great! I had one computer set aside for the Writing Center. Students did not have to write in this area if they didn't want to. Students had the freedom to choose where they worked in any center as long as they were on task and not bothering students working in the Reading Center.


WHAT WORKED:
1) Students were writing DAILY. This is so important for primary students. Writing is hard! But when students get that daily practice and are using the things we did in whole group lessons in their independent writing, they will grow as writers. The quality of their writing got better and better throughout the year and while other things attributed to that as well, I truly believe the reason they got so much better was because they had that daily practice.
2) By utilizing the Essential Question for the week, students were looking for text evidence on the topic and making self-to-text connections the entire time. It helped the centers run smoothly and connected to each other.
3) Students were really excited to get to type their papers. This is a crucial skill that gets lost in the shuffle. Students got the typing practice while working on their final step in the writing process: publishing. 


This is the center that took the most planning each week, because the skills we were focusing on were constantly changing. There were two folder activities planned each week that I would write in the title with a dry erase marker. They were called folder activities simply because the students were to find them in the blue and green folders on the shelf (pictured below). Depending on the week's skill we were focusing on (adjectives, possessive nouns, short a words, etc.), I changed the activities in the folders to match. I usually had one on grammar and one on spelling, but it truly depended on the week and the needs of the students. Generally, I found these items on TpT, Pinterest, or made them myself. The Vocabulary Board was awesome as well because some students really didn't need the spelling practice or grew bored with the same word lists over and over again. The Vocabulary Board (found HERE for free - Thank you, Free to Teach!) gave students the opportunity to work with more challenging words that were also a part of the unit we were working on.

Here's how things were stored. Each shelf was clearly labeled as to what went there (although as I'm looking at this I see a box of skinny markers with the letter magnets! Ah, children...) Not pictured is the side of the shelf to the right where the Must Do list was posted as well as the Vocabulary Board and the Spelling Word list (students also had their own copy of the Spelling Word list in their folders).

One FREEBIE I have posted in my store for the Word Work center is the stamping word list. It will work with ANY word list so go download it and save yourself some time and copies! Click the picture below to head there now.


WHAT WORKED:
1) Each week, the word list changed, but the activities in the Can Do section didn't have to. Students would sometimes choose stamping or building to spice things up for them. They knew when they wanted something different and would choose it.
2) Although the activities didn't change throughout the year, the folder activities did which gave students variety. I tried to change things up for them with activities like scavenger hunts, building words out of larger words, task cards, and sometimes (even though it's not "word work"), I'd sneak in a close read.


Let's move on to some of the other procedures in my room and how I held students accountable.


Students kept their work in their Center Folder which I labeled at the beginning of the year. It was easy for me on Fridays to grab the items from the Finished side and take note of what students couldn't finish. It was also great for the students who didn't remember what they still needed to finish. 

I did two 25 minute rotations every day so by the end of Thursday, students had gone to each center twice with ample time to complete the Must-Do's and usually have time for some free choice.

Each Friday, after lunch, we did something called "Ketchups and Pickles." WE LOVED KETCHUPS AND PICKLES! I made a list of all the Must-Do's and what I needed from the students. It was always written on the white board but I erased it for the end of the year before I thought to snap a picture, so here is the typed up copy that I would also post on the Smart Board on Friday afternoons. (sorry!).


On Thursday afternoons, I would take out the students' work from their folders and grab their Reading notebooks. Each week I would check off the students who finished each task. This also gave me an opportunity to make sure students were understanding the skill or task. If I saw that something wasn't working, I wouldn't check them off and I would move their paper to "Still Working" with a note that said "See me." I would also log in to AR and take note of students who took their AR tests. On the list, you'll see there are Math and Science activities. It looks like a lot, but keep in mind that students have more than enough time to complete these things throughout the week and we discussed many times that being a "Ketchup" isn't a bad thing. I would make a list of students that needed to "Ketchup" on a task and post it after lunch on Fridays. As students caught up on their work, they crossed their name off the list! Simple! This was also how I handled make-up work. Students knew when they were absent that they might not get to be a Pickle and because we had it ingrained that being a Ketchup wasn't a bad thing, I never had a problem. :)

What did the Pickles do? Well, they got to pick a fun center. I usually had coloring pages, LEGOs, computer time (ABCya or Cool Math make the difference!), puzzles, and board games. 

The "Special items" on the Ketchup and Pickles list was anything that we may have done whole group that needed to be finished up and students would know ahead of time if this was a Ketchup and Pickles activity.


I absolutely LOVED how smoothly centers ran this year. My students loved the free choice, I loved that they were engaged, and I loved how easy it was to run each week after some practice.

Next week we are checking out how Fluency and Goals worked in my classroom this year!


If you are a blogger and would like to link up with "What Worked" in your ELA Centers this year, read the rules below and snag all the images you'll need! I can't wait to read what worked for you this year! 

RULES:
1) Must include the What Worked Schedule in each post that links back to Daisy Designs.
2) Links MUST be to BLOG POSTS relating to the topic of each week. NO PRODUCT LINKS. Product links and photos are totally okay within your blog post, but not as a link in the linky.
3) Check out the other bloggers' posts and comment on the one posted before yours.


And here are the images to get you started for next week's posts on Fluency and Goals! Thanks for stopping by!


May 18, 2016

What Worked: Science Notebooks

Howdy, readers! Today is the first day in the blogging series/linky "What Worked." For the next few weeks I'll be posting about the reflections and best practices I've had in the classroom this year. It is also open for other bloggers to share their posts on each topic, so be sure to check out the other posts at the end! I can't wait to read what everyone else has posted so I can continue to improve my instruction year to year.


Today being the first day, I am here to bring you what worked in the area of Science Notebooks! MY FAVORITE!!!


Let me begin by making a few important points:

1) I did not create everything that went into the Science Notebook. I used many different resources to make sure my students had a lot of variety, which is something that definitely WORKED! Underneath each picture there's a link to the location in which the resource can be found.

2) I did not take a picture of every single page in the notebook. We would be here all day, people. I tried to get a picture of a lot of different types of resources used, so you can see the variety. Most often, I used a resource type more than once for each unit of study.

3) The photos are taken from student notebooks, so they are created and loved by kids. The key for me was that students needed to be neat, but that ultimately it is THEIR notebook. Often you will see doodles and decorations, which I would like to point out was something that WORKED! My students had ownership of their notebook. They loved their notebook. And when I said, we're going to do a Science Notebook activity, I got actual cheers of excitement! :)

Let's get started!


Let's talk about the notebook itself. These are the 1 subject spiral notebooks from Target (the Up and Up brand). My county was lucky enough to have a TON of these donated to us by our local Target, so I used them for our Science notebooks.

WHAT WORKED:
1) The plastic cover was super durable. This picture was taken this week after an entire year of using them!
2) There is a cardboard pocket inside before the first page which was wonderful for those times where we didn't get to finish something and had to store it for later. It also worked well for student make-up work if they were absent. If a student was absent, I just slid in what we did into the pocket for them to make-up later!

The cover page is part of a great freebie from Not So Wimpy Teacher, which is where I also got their Table of Contents pages. Click HERE to download it.

I printed one out for each kiddo, we trimmed them, colored them, and then I used packing tape to secure it all the way on. It makes it look like the whole front is laminated.


Here's a picture of one of the Table of Contents pages. This is also in the freebie offered by Not So Wimpy Teacher. We made sure to update our Table of Contents each time we did an activity and the kiddos labeled each page to match the page number.

NOTE:
Some activities took more than one notebook page, but to save space on our Table of Contents, students got in the habit of labeling each page for the activity the same page number if it had more than one so we didn't have to keep writing the same activity over and over again in the contents. For example, the Rocks Science Spin was a two page notebook activity, so both pages were labeled with a 23.


RESOURCE LOCATION #1:
I found this little dude in the Second Grade AIMS Life Science book which we have available to us at our school. I found a lot of printable resources from that book that went well with hands on experiments as well.

WHAT WORKED:
1) These types of activities where students can flip open flaps and see what's underneath were a HUGE hit with my kiddos. This was one of the first activities we did at the beginning of the year and I still catch some students going back to look at it and lift the flaps. It was highly engaging and still is!
2) This was a FREE resource for me. I just went to the school's resource room, found the book, and made some copies.


RESOURCE LOCATION #2:
I created this one myself after I found that there were not that many Second Grade notebook resources for the Human Body unit. This foldable is part of my Human Body Unit, which you can find HERE or by clicking the image below. This is just one of MANY foldables included in it which are suitable for primary kiddos.


WHAT WORKED:
1) Colored paper RULES. Unfortunately I didn't have much of a budget for colored paper and I was not able to spend a ton of my own money on colored paper, but when I did, BOY HOWDY, it made a big difference on the level of engagement and excitement from my kiddos. The colored paper makes it eye popping.
2) Flip flaps are a total win. Similar to the human body dude above, the students love to go back and flip these open which is practicing on their own (can you say, every teacher's dream??)


RESOURCE #3:
This is actually from a product on TPT that is advertised as a lapbook activity. Instead of creating a lapbook, however, I picked out the activities I thought would be best for my class's needs and we put them in our notebook instead! So if you ever see a great lapbook activity on TPT but don't think you'll have the time to complete each piece with your class, don't disregard it! It still has tons of interactive activities that will go great in a notebook! This specific activity is from the Butterfly Life Cycle Lapbook by Mrs. D's Corner. 

WHAT WORKED:
1) I used the activities that worked for my class, but didn't feel obligated to use up my file folders and copies on every page that didn't fit into our schedule. It's a win-win! I also still have the file in the event that one year, I may want to do the lapbook! Who knows?
2) Lapbook files tend to have a LOT of different styles of foldables and activities because when you put them together into the file folder, you want them to look snazzy and exciting. That means that although we are working on the same unit of study, the kiddos have a lot of varying types of activities and foldables. Happy kiddos!


RESOURCE #4:
Sometimes the plain ole worksheet will make it's appearance into the notebook. A lot of times, I'm able to find these in free downloads on TPT, on Pinterest, or even just Google Images! I tended to use things like this when time was limited, there was a substitute, or when I was running out of copies for the month! This specific worksheet was also included in the Butterfly Life Cycle Lapbook by Mrs. D's Corner.

WHAT WORKED:
1) Quick and easy!
2) Depending on the worksheet, they were just as engaging as the flip flaps but they took less time to construct. Again, varying the type of activity made a world of difference for my kiddos this year.


RESOURCE #5:
This was a freebie I found on TPT of an emergent reader/mini-book. It is offered for free by First Grade Schoolhouse. Click HERE to download.

WHAT WORKED:
1) With the printable half page books like this, you can fit a lot into one notebook page. This little booklet has 5 pages fit into one stapled booklet. That's a lot of information at the students' fingertips but without wasting several pages of our Science Notebook.
2) This kind of mini-book has lines for students to write in what is happening in each illustration. This kind lends itself well for students to make connections and become the author of their Science Notebook. This was a great formative assessment tool for me to make sure the students understood the steps in the life cycle.


RESOURCE #5:
This is also from an AIMS Science book found at my school. These are little foldable mini-books full of information. I just snagged a box of envelopes at the dollar store, we glued them in, and VOILA! A little book pocket! It isn't pictured, but we worked on highlighting key details inside the mini-book and on the page next to the book, we wrote the facts we learned from it.

WHAT WORKED:
1) Variety, variety, variety!
2) The students really liked decorating their envelopes and typically decorated them to match the topic we were working on. This student drew the ground with little pea plants coming up! 
3) These helped me integrate ELA by highlighting key details and summarizing the facts on the other side.


RESOURCE #6:
I am lucky enough to have a school that subscribes to Scholastic News and Science Spin. They don't always match the unit we are studying, but sometimes they do! We read them, do the fun activities, and then we chop them up and make our "own" magazine page! This one pictured above is from Rocks That Rock Science Spin. We cut out each paragraph and each picture to match and glued them in!

WHAT WORKED:
1) Very colorful and exciting to see in the notebooks. I already mentioned that COLOR makes a big difference!
2) This was a resource literally delivered to my classroom door. Not every school subscribes to this, but if you are able to speak with someone at your school or to get any sort of grant for it, try! It is an awesome resource and you get TONS of them throughout the year. There's also interactive games and vocabulary on the website that we use on the Smart Board as we read along.


RESOURCE #7:
Dirt?! That's right. We were studying rocks and soil and my students brought soil in from their backyards. I have found that if it is something that is small or flat, why not put it in? My students freaked out excitedly to get this taped in! 

WHAT WORKED:
1) Well, it's dirt. It's free. It's easy to find.
2) There was an awesome shock factor involved with this. The kids were blown away that I actually had them tape their dirt into their notebook! NOTE: You'll definitely want to use packing tape on this...


RESOURCE #8:
Readworks.org is an amazing place to get reading passages! I use that site ALL THE TIME! Not all the passages are as awesome as this one with the chart to glue in, but many are. They have all subjects and all grade levels. I chose this one to share on the blog because it has the awesome chart as well as bolded words (yay text features!) and helped a lot with vocabulary. Not pictured are the comprehension questions included. After each passage on Readworks.org, there are comprehension questions! By the way... this is a FREE resource!

WHAT WORKED:
1) The website let me select the passages based on my students' needs. There are all different reading levels and the variety is amazing.
2) There are paired passages also on Readworks.org. There was another article "paired" with this one that allowed us later to compare and contrast.
3) The comprehension questions are already there and done for you. Just print and go! Sometimes I put these in their notebooks, other times I used them as quizzes or assessments. The possibilities are endless.


RESOURCE #9:
This was one of those ideas I had late into the year that I wish I had thought of AGES ago! I received a ton of those manila library book pocket things and wanted to use them somehow in our Science Notebooks. I had the students glue two of them in, fold the tops down and we created pockets for vocabulary flash cards and definitions. I used these in a lot of different ways. The first day I introduced the unit, we cut our cards and set up the page. Then we watched a video on BrainPop Jr. While we watched the video, we paid attention and listened for the vocabulary words they talked about. For example, if the video told us what "liquid" was, we put the card into our little stack. Usually, BrainPop Jr. talked about about 75% of the words in our pile. It chunked the learning of the words into smaller sections so the words were not overwhelming. It also made the students really focus on what the video was saying. This page was also handy because throughout the unit, we used them to play a matching game, quizzed our partners on our vocabulary, and played a memory match game with them facing down.

WHAT WORKED:
1) High level of engagement, no matter what point in the unit you are in. Students were super focused on the video listening for each word. They were excited to match them up when they started to master the vocabulary and they LOVED playing memory match and using them as flashcards with their partners.
2) By focusing on a few words at a time, we chunked the list of vocabulary words to make it easier to learn and less overwhelming.


So there ya have it! I hope these help you get prepared for next year. If you haven't been using Interactive Science Notebooks, what are you waiting for?! They are seriously a game changer.

Make sure you stop by next week for the next post in the "What Worked" series. Next week's topic is ELA Centers!


If you are interested in linking up your blog post about what worked with your Science Notebooks, please read the rules below and have fun!

RULES:
1) Must include the What Worked Schedule in each post that links back to Daisy Designs.
2) Links MUST be to BLOG POSTS relating to the topic of each week. NO PRODUCT LINKS. Product links and photos are totally okay within your blog post, but not as a link in the linky.
3) Check out the other bloggers' posts and comment on the one posted before yours.

And here are the images to get you started for next week! Thanks for stopping by!